 About the Donor Reports Page
Setup Options for the Contribution Detail Statement Report
Setup Options for the Canadian Tax Receipt Report
Setup Options for the Pledge Statement Report
Setup Options for the Non-Giver Letter
Overview
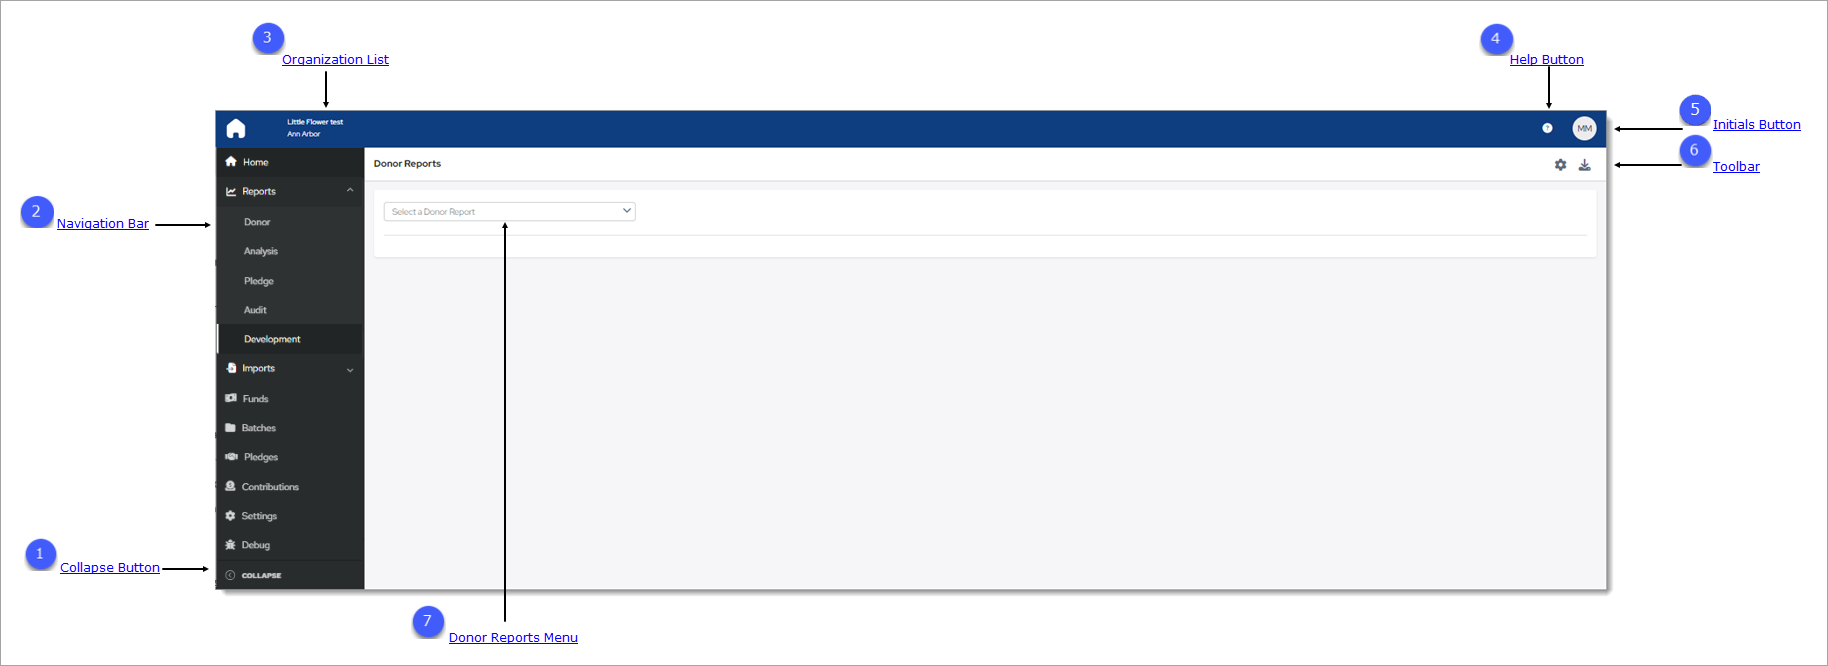
The Donor Reports page provides a central location where you can set up and generate custom contribution statements and pledge statement reports. The illustration below identifies the main elements on the Donor Reports page. Click a numbered to view a detailed description of the element.
To access the Donor Reports page, you must either have Organization Admin access rights tied to your login or Offering > Print permissions. If you do not have Offering > Print permissions, the Reports option is not visible in Offering menu in the navigation bar.
Access rights and permissions are granted to individual users in their staff records, accessed through the Manage Staff page in the Administration module. You must have Organization Admin rights to view the page and assign permissions. For details, see the online Help for the ParishSOFT Administration module.
 Collapse Button
By default, the Navigation Bar is expanded, so the entire name of each page is visible. If you need more viewing space in the right panel, you can collapse the menu by clicking  . Doing so minimizes
the menu so that only the page icons are visible:
. Doing so minimizes
the menu so that only the page icons are visible:

To return the Navigation Bar back to the expanded position, click  (Expand). Note that the state (expanded or minimized) of the menu that you specify on any page stays the same
on all pages until you change it.
(Expand). Note that the state (expanded or minimized) of the menu that you specify on any page stays the same
on all pages until you change it.
 Navigation Bar
The Navigation Bar is the menu that sits on left side of the Donor Reports page (and on every other page in the module). The menu lists the module's primary pages and provides a way for you to quickly move from one page to another. When you want to view a specific page's content, simply select the page option.
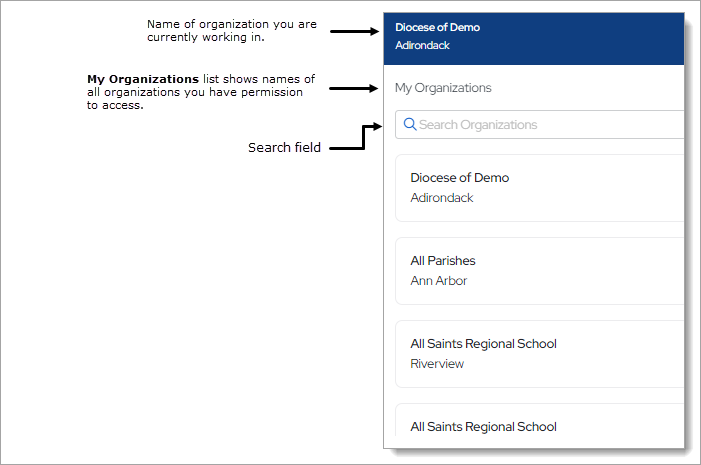
 Organization List
The Organization list is located above the Navigation Bar. By default, this dropdown list is closed and shows the name of the organization you are working in.
- If you have access to one organization, the list displays the name of your organization. The dropdown functionality is disabled because you have limited access.
- If you have access to multiple organizations, the list displays the name of the organization you are working on or last worked in. Select the organization’s name to display a list of all the organizations you have permission to access. If the list is long, you can either type the organization’s name into the Search Organizations field (see illustration below) or use your mouse to scroll through the list to find the organization you want and then select it.
 Help Button
Click  to access the Offering Help. The Help opens in a separate browser so that you can view it while working in the application. The Help provides
an overview of Development Manager's concepts and features and offers step-by-step instructions on how to perform specific Development Manager tasks.
to access the Offering Help. The Help opens in a separate browser so that you can view it while working in the application. The Help provides
an overview of Development Manager's concepts and features and offers step-by-step instructions on how to perform specific Development Manager tasks.
 Initials Button
This button shows the initials of the logged-in user. Clicking the button display the Log Out option. Click this option to log out of Offering.

 Toolbar
These toolbar buttons are located in the upper-right corner. In the list below, click the name of a button to view its description:
Click this button to open the Report Contents window. This window contains options used to configure elements of your donor reports.
Click this button to generate the report. From the displayed menu, select the desired format:
- Excel: the Excel version uses the same data source as the PDF but may contain more data, which is presented in an .xls layout. Choose this option if you want to do a mail merge or if you want to import the data in the selected report into a spreadsheet program, such as Microsoft Excel.
-
PDF: the PDF version is useful for most purposes because it extracts the most commonly needed data from the report and presents it in a well-designed layout. Note that the PDF contains less information than the .xls version and is a more suitable option when you need a document that is easily read.
 Donor Reports Menu
The Donor Reports menu contains the names of the donor reports you can generate. In the list below, click the name of a report to view its description.
The Contribution Detail Statements report generates individual statements detailing the contributions made by selected donors during the time period specified in the report setup. A message template is also provided that enables you to create a custom message to accompany the statements If you have an organization logo or signature image, they can be added to give the message a more professional and personal look and feel.
To view setup options, go to Setup Options for the Contribution Detail Statement Report.
Tax Receipt (Canada only)Tax Receipt (Canada only)
The Tax Receipt report generates tax receipts summarizing the contributions made by selected Canadian donors during the time period specified in the report setup. The receipts comply with CRA (Canadian Revenue Agency) requirements regarding the information required on an official tax receipt.
To view setup options, go to Setup Options for the Canadian Tax Receipt Report.
Pledge StatementPledge Statement
The Pledge Statement report generates individual statements detailing the pledges made by selected donors during the time period specified in the report setup.
To view setup options, go to Setup Options for the Pledge Statement Report.
Non-Giver LetterNon-Giver Letter
The Non-Giver Letter report generates a custom letter you can send to donors who have stopped giving and donors who have made no contributions.
To view setup options, go to Setup Options for the Non Giver Letter Report.
Donor Reports Setup
The following sections describe the options used to set up donor reports.
Setup Options for the Contribution Detail Statement Report (United States only)
![]() To use the options listed below to set up a Contribution Detail Statement report, you must be located in an organization whose Country field
is set to USA in the organization's record. Organization records are created and maintained on the Organizations page in the Family Suite Administration module.
To use the options listed below to set up a Contribution Detail Statement report, you must be located in an organization whose Country field
is set to USA in the organization's record. Organization records are created and maintained on the Organizations page in the Family Suite Administration module.
After you select the Contribution Detail Statement option from the Select a Donor Report dropdown list, you can use the options listed below to configure the report.
![]() An asterisk (*) indicates required information.
An asterisk (*) indicates required information.
In the list below, click the arrowhead next to an option to expand it and view its description.
Select the desired contribution source for the report:
- Families: includes contributions made by all family members (those made on behalf of the entire family and those made by individual family members. A single statement is generated that shows contributions by the family and details of individual family member's contributions.
After selecting this option, select one of these options: All Families (includes all families), Only Selected Families (includes only the families you select), or Family ID (includes only those families within the Family ID range you specify).
- Members: includes contributions made by individual members only. A separate statement is generated for each member.
After selecting this option, select one of these options: All Members (includes all members), Only Selected Families (includes only the members you select), or Member ID (includes only those members within the Member ID range you specify).
- Families (include Member Gifts): includes contributions linked to the family and individual family members.
After selecting this option, select one of these options: All Families (includes all families), Only Selected Families (includes only the families you select), or Family ID (includes only those families within the Family ID range you specify) .
Enter the minimum amount for contributions to include in the report.
The system saves the Minimum Amount value you specify as your personal default. Even after you log out and back in again, the setting remains the same until you change it. Note that the setting is saved on your local device, so if you log in using a different device, you may see a different setting.
Enter the minimum amount for contributions to include in the report.
The system saves the Maximum Amount value you specify as your personal default. Even after you log out and back in again, the setting remains the same until you change it. Note that the setting is saved on your local device, so if you log in using a different device, you may see a different setting.
The date filters let you specify a date or date range for contributions to include in the report.
To specify a start date only, type a date in the Start Date field. Alternatively, click ![]() and select a start date from the calendar.
and select a start date from the calendar.
To specify a date range, enter dates in both the Start Date and End Date (see next option) fields.
The system saves the Start Date setting you specify as your personal default. Even after you log out and back in again, the setting remains the same until you change it. Note that
the setting is saved on your local device, so if you log in using a different device, you may see a different setting.
The date filters let you specify a date or date range for contributions to include in the report.
To specify an end date only, type a date in the End Date field. Alternatively, click ![]() and select an end date from the calendar.
and select an end date from the calendar.
To specify a date range, enter dates in both the End Date and Start Date (see previous option) fields.
The system saves the End Date setting you specify as your personal default. Even after you log out and back in again, the setting remains the same until you change it. Note that
the setting is saved on your local device, so if you log in using a different device, you may see a different setting.
Print Labels checkboxPrint Labels checkbox
Select the checkbox to print a separate report that contains mailing labels for the selected families or members.
Lists the options available for inserting a handwritten signature image at the bottom of the donor letter. Select the desired option. If you do not want to include a handwritten signature, select None.
![]() The options appearing in the Signature dropdown list are defined in the donor report configuration.
For instructions on configuring the options in this list, go to
Signature Options.
The options appearing in the Signature dropdown list are defined in the donor report configuration.
For instructions on configuring the options in this list, go to
Signature Options.
![]() For instructions on creating a signature image to insert in your reports, go to How to Create a Signature Image.
For instructions on creating a signature image to insert in your reports, go to How to Create a Signature Image.
The dropdown list includes the letterhead options available for insertion into the header area at the top of the donor letter. Select the desired option. If you do not want to include a letterhead, select None.
![]() The options appearing in the Letterhead dropdown list are defined in the donor report configuration.
For instructions on configuring the options in this list, go to Letterhead Options.
The options appearing in the Letterhead dropdown list are defined in the donor report configuration.
For instructions on configuring the options in this list, go to Letterhead Options.
Body of StatementBody of Statement
The dropdown list includes the options available for inserting text into the body of statement area in the donor letter that accompanies the statement. Select the desired option. If you do not want to include body of statement text, select None.
![]() The options appearing in the Body of Statement dropdown list are defined in the donor
report configuration. For instructions on configuring the options in this list, go to Body_of_Statement_Templates.
The options appearing in the Body of Statement dropdown list are defined in the donor
report configuration. For instructions on configuring the options in this list, go to Body_of_Statement_Templates.
The dropdown list includes the options available for inserting a printed name under the handwritten signature in the donor letter. Select the desired option. If you do not want to include a printed name, select None.
![]() The options appearing in the Printed Name dropdown list are defined in
the donor report configuration. For instructions on configuring the options in this list, go to Printed_Name Options.
The options appearing in the Printed Name dropdown list are defined in
the donor report configuration. For instructions on configuring the options in this list, go to Printed_Name Options.
The Report Type filter has three settings that you can apply to determine the contribution details to include in a report:
- All Details: shows the dollar amount of all contributions made to the selected funds.
![]() On a donor's statement, multiple contributions given on the same day are aggregated and reported as a single amount. Multiple contributions with different check numbers or memos that are
made on the same day to the same fund are listed individually with separately reported amounts.
On a donor's statement, multiple contributions given on the same day are aggregated and reported as a single amount. Multiple contributions with different check numbers or memos that are
made on the same day to the same fund are listed individually with separately reported amounts.
- Details for $250+: shows the details for contributions of $250.00 or more.
- Fund Totals Only: shows the dollar amount of contributions made to each fund.
Family RegistrationFamily Registration *
Lets you filter the report by family registration status:
- Yes: includes only the records of families registered to the organization.
- No: includes only the records of families that are not registered to the organization.
- Both: includes the records of registered and non-registered families.
The system saves the Family Registration setting you select as your personal default. Even after you log out and back in again, the setting remains the same until you change it. Note that the setting is saved on your local device, so if you log in using a different device, you may see a different setting.
Family WorkgroupFamily Workgroup
The Family Workgroup list shows the names of the organization's family workgroups. To generate statements for families belonging to a specific family workgroup, select the desired workgroup. Alternatively, if you do not want to filter the report by any family workgroup, select the blank option (the first option in the list).
![]() Selecting the blank option also removes the previously selected workgroup.
Selecting the blank option also removes the previously selected workgroup.
The system saves the Family Workgroup setting you select as your personal default. Even after you log out and back in again, the setting remains the same until you change it. Note that the setting is saved on your local device, so if you log in using a different device, you may see a different setting.
Select One or More FundsSelect One or More Funds
The funds list shows the names of funds for which you can generate statements. Individually select the funds you want. Alternatively, if you want to generate statements for all funds in the list, select the Fund Name checkbox at the top of the list.
![]() The list includes only those funds the logged-in user has permission to access.
The list includes only those funds the logged-in user has permission to access.
Select One or more Family GroupsSelect One or more Family Groups
The dropdown list includes all of the family groups created in your organization. Select one or more groups you want to include in the report.
Setup Options for the Tax Receipt Report (Canada only)
![]() To use the options listed below to set up a Tax Receipt report, you must be located in an organization whose Country field is set
to Canada in the organization's record. Organization records are created and maintained on the Organizations page in the Family Suite Administration module.
To use the options listed below to set up a Tax Receipt report, you must be located in an organization whose Country field is set
to Canada in the organization's record. Organization records are created and maintained on the Organizations page in the Family Suite Administration module.
After you select the Tax Receipt option from the Select a Donor Report dropdown list, you can use the options listed below to set up the report.
![]() An asterisk (*) indicates required information.
An asterisk (*) indicates required information.
In the list below, click the arrowhead next to an option to expand it and view its description.
Tax Receipt Summary buttonTax Receipt Summary button
Opens the Tax Receipt Summary window where you can create a tax receipt summary report. This report lists the tax receipts issued by the logged-in user's organization. The report also includes voided receipts so that an organization, if audited, can use the report to account for all receipt numbers.
For instructions on creating this report, go to How to Create a Tax Receipt Summary Report.
Select the desired contribution source for the report:
- Families: includes contributions made by all family members (those made on behalf of the entire family and those made by individual family members). A single statement is generated that shows contributions by the family
and details of individual family member's contributions. After selecting this option, select one of these options: All Families (includes all families),
Only Selected Families (includes only the families you select), or Family ID (includes only those families within the Family ID range
you specify).
- Members: includes contributions made by individual members only. A separate statement is generated for each member. After selecting this option, select one of these options: All Members (includes all members), Only Selected Families (includes only the members you select), or Member ID (includes only those members within the Member ID range you specify).
The date filters let you specify a date or date range for contributions to include in the report.
To specify a start date only, type a date in the Start Date field. Alternatively, click ![]() and select a start date from the calendar.
and select a start date from the calendar.
To specify a date range, enter dates in both the Start Date and End Date (see next option) fields.
The date filters let you specify a date or date range for statements to include in the report.
To specify an end date only, type a date in the End Date field. Alternatively, click ![]() and select an end date from the calendar.
and select an end date from the calendar.
To specify a date range, enter dates in both the End Date and Start Date (see previous option) fields.
This filter lets you set a minimum contribution amount. Any contributions less than the amount you specify are not included in the report.
Lists the letterhead options available for insertion into the header area at the top of the donor letter. Select the desired option. If you do not want to include a letterhead, select None.
![]() The options appearing in the Letterhead dropdown list are defined in the donor report configuration. For instructions
on configuring the options in this list, go to
Letterhead Options.
The options appearing in the Letterhead dropdown list are defined in the donor report configuration. For instructions
on configuring the options in this list, go to
Letterhead Options.
Body of StatementBody of Statement
The dropdown list includes the options available for inserting text into the body of statement area in the letter that accompanies the tax receipts. Select the desired option. If you do not want to include body of statement text, select None.
![]() The options appearing in the Body of Statement dropdown list are defined in the donor
report configuration. For instructions on configuring the options in this list, go to Body_of_Statement_Templates.
The options appearing in the Body of Statement dropdown list are defined in the donor
report configuration. For instructions on configuring the options in this list, go to Body_of_Statement_Templates.
Lists the options available for inserting a handwritten signature image at the bottom of the letter that accompanies the tax receipts. Select the desired option. If you do not want to include a handwritten signature, select None.
![]() The options appearing in the Signature dropdown list are defined in the donor report configuration.
For instructions on configuring the options in this list, go to Signature Options.
The options appearing in the Signature dropdown list are defined in the donor report configuration.
For instructions on configuring the options in this list, go to Signature Options.
![]() For instructions on creating a signature image to insert in your reports, go to How to Create a Signature Image.
For instructions on creating a signature image to insert in your reports, go to How to Create a Signature Image.
The dropdown list includes the options available for inserting a printed name under the handwritten signature in the letter that accompanies the tax receipts. Select the desired option. If you do not want to include a printed name, select None.
![]() The options appearing in the Printed Name dropdown list are defined in the donor report configuration. For instructions on configuring
the options in this list, go to Printed_Name Options.
The options appearing in the Printed Name dropdown list are defined in the donor report configuration. For instructions on configuring
the options in this list, go to Printed_Name Options.
Receipt SignatureReceipt Signature
Lists the options available for inserting a handwritten signature image at the bottom of the tax receipt. Select the desired option. If you do not want to include a handwritten signature, select None.
![]() The options appearing in the Signature dropdown list are defined in the donor report configuration.
For instructions on configuring the options in this list, go to Signature
Options.
The options appearing in the Signature dropdown list are defined in the donor report configuration.
For instructions on configuring the options in this list, go to Signature
Options.
Select the option that indicates the type of contribution the tax receipt is being issued for:
- Regular: in all versions of the report (Official, Preview, and Excel), selecting this option generates a separate receipt for each donor. The receipts record cash contributions only. Receipts for this contribution type do not include a Description field. Other information contained on the receipts is determined by the criteria and filters the users select in the Tax Receipt report setup.
- Stocks and Gifts in Kind: in all versions of the report (Official, Preview, and Excel), selecting this option generates a separate receipt for each contribution. The receipts record non-cash contributions only. Examples of non-cash contributions include stocks, stocks and security, gifts in kind (tangible goods like jewelry, art, and clothing), to name a few. Receipts for this type of contribution include a Description field that provides details about the non-cash gift that was donated. Other information contained on the receipts is determined by the criteria and filters the users select in the Tax Receipt report setup.
Select One or More FundsSelect One or More Funds *
The funds list shows the names of funds for which you can generate tax receipts. Individually select the funds you want. Alternatively, if you want to generate tax receipts for all funds in the list, select the Fund Name checkbox at the top of the list.
![]() The list includes only those funds the logged-in user has permission to access.
The list includes only those funds the logged-in user has permission to access.
Setup Options for the Pledge Statement Report
After you select the Pledge Statement Report option from the Select a Donor Report dropdown list, you can use the options listed below to configure the report:
![]() An asterisk (*) indicates required information.
An asterisk (*) indicates required information.
In the list below, click the arrowhead next to an option to expand it and view its description.
The funds list shows the names of funds you can select to include in the report. You must select at least one fund.
![]() The list includes only those funds you have permission to access.
The list includes only those funds you have permission to access.
Statement MonthStatement Month *
Select the number that corresponds to the month you are generating statement for. For example, select 6 for June and 10 for October.
Statement YearStatement Year *
Enter the year for which you want to generate statements. For example, 2019.
Only Pledges with a balanceOnly Pledges with a balance
Select the checkbox to generate statements only for pledges with a remaining balance.
Include remittance slipInclude remittance slip
Select the checkbox to attach a remittance slip that donors can return with their payments. The remittance slip contains the donor's name and other identifying information so that the payment can be properly credited to the donor's account.
Statement DateStatement Date *
Specify the date the pledge statement was prepared. To do this, type a date in the Start Date field. Alternatively, click ![]() and select a date from the calendar.
and select a date from the calendar.
Contribution Scheduled forContribution Scheduled for *
Specify the date the contribution to the pledge is scheduled for. To do this, type a date in the Start Date field. Alternatively, click ![]() and select a date from the calendar.
and select a date from the calendar.
Scheduled ContributionScheduled Contribution
Select one:
- Use Installment Amount from pledge
- Adjust amount for extra or missed payments
- Do not print next scheduled payment
Select an OptionSelect an Option *
Select the option for the statements you want to include in the report:
-
View Statements scheduled for Statement Month/Year: generates statements for the month and year selected in the Statement Month and Statement Year dropdown lists.
-
View Statements for Donors with gifts expected in Statement Month/Year: generates statements for donors whose pledge payments are expected to be received the month and year selected in the Statement Month and Statement Year dropdown lists.
-
View Families who haven't given in Statement Month/Year: generates a list of families whose pledge payments were not received in the month and year selected in the Statement Month and Statement Year dropdown lists.
-
View Statement for all givers to the Fund: generates statements for all givers to the selected fund.
The dropdown list includes the options available for inserting a handwritten signature image at the bottom of the letter accompanying the statements. Select the desired option. If you do not want to include a handwritten signature, select None.
![]() The options appearing in the Signature dropdown list are defined in the donor report configuration. For instructions on configuring the options in this list,
go to Signature Options.
The options appearing in the Signature dropdown list are defined in the donor report configuration. For instructions on configuring the options in this list,
go to Signature Options.
![]() For instructions on creating a signature image to insert in your reports, go to How to Create a Signature Image.
For instructions on creating a signature image to insert in your reports, go to How to Create a Signature Image.
The dropdown list includes the letterhead options available for insertion into the header area at the top of the letter accompanying the statements. Select the desired option. If you do not want to include a letterhead, select None.
![]() The options appearing in the Letterhead dropdown list are defined in the donor report configuration. For instructions on configuring the options in this list,
go to Letterhead Options.
The options appearing in the Letterhead dropdown list are defined in the donor report configuration. For instructions on configuring the options in this list,
go to Letterhead Options.
Body of StatementBody of Statement
The dropdown list includes the options available for inserting text into the body of statement area in the donor letter. Select the desired option. If you do not want to include body of statement text, select None.
![]() The options appearing in the Body of Statement dropdown list are defined in the donor report configuration. For instructions on configuring the options
in this list, go to Body_of_Statement_Templates.
The options appearing in the Body of Statement dropdown list are defined in the donor report configuration. For instructions on configuring the options
in this list, go to Body_of_Statement_Templates.
The dropdown list includes the options available for inserting a printed name under the handwritten signature in the donor letter. Select the desired option. If you do not want to include a printed name, select None.
![]() The options appearing in the Printed Name dropdown list are defined in the donor report configuration. For instructions on configuring
the options in this list, go to Printed_Name Options.
The options appearing in the Printed Name dropdown list are defined in the donor report configuration. For instructions on configuring
the options in this list, go to Printed_Name Options.
Family RegistrationFamily Registration *
Select an option to filter the report by family membership:
- Both: the report includes both registered and non-registered families.
- Yes: the report includes registered families only.
- No: the report includes non-registered families only.
Family WorkgroupFamily Workgroup
The dropdown list includes the family workgroups created in your organization. Select one or more workgroups you want to include in the report.
When you select the Print Labels option, the generated report includes a second page of printable mailing labels. The labels appear in the same order as the statements so that you can easily prepare mass mailings. The labels show the name and primary address of the family as recorded in Family Details. They are formatted for the Avery 5160 template.
Select One or more Family GroupsSelect One or more Family Groups
Lists the family groups created in your organization. Select one or more groups you want to include in the report.
Setup Options for a Non-Giver Letter Report
After you select the Non Giver Letter Report option from the Select a Donor Report dropdown list, you can use the options listed below to configure the report.
![]() An asterisk (*) indicates required information.
An asterisk (*) indicates required information.
In the list below, click the arrowhead next to an option to expand it and view its description.
Select the desired contribution source for the report:
- Families: includes all families that have stopped giving or never made a contribution to the selected fund. After selecting this option, select one of these options: All Families (includes all families), Only Selected Families (includes only the families you select), or Family ID (includes only those families within the Family ID range you specify).
- Members: includes all members that have stopped giving or never made a contribution to the selected fund. After selecting this option, select one of these options: All Members (includes all members), Only Selected Families (includes only the members you select), or Member ID (includes only those members within the Member ID range you specify).
- Families (include Member Gifts): includes families and individual family members that have stopped giving or never made a contribution to the selected fund. After selecting this option, select one of these options: All Families (includes all families), Only Selected Families (includes only the families you select), or Family ID (includes only those families within the Family ID range you specify).
When you run a Non-Giver Letter report, the individual letters now appear in order by the recipient’s last name followed by first name. This order matches the sequence of the report’s mailing labels, which makes it easier
for you to prepare mass mailings.
The date filters let you set a date or date range to find families or members who did not give during the specified period.
To specify a start date only, type a date in the Start Date field. Alternatively, click ![]() and select a start date from the calendar. To specify a date range, enter dates in both the Start Date and End Date (see next option) fields.
and select a start date from the calendar. To specify a date range, enter dates in both the Start Date and End Date (see next option) fields.
The date filters let you set a date or date range to find families or members who did not give during the specified period.
To specify an end date only, type a date in the End Date field. Alternatively, click ![]() and select an end date from the calendar. To specify a date range, enter dates in both the End Date and Start Date (see previous option) fields.
and select an end date from the calendar. To specify a date range, enter dates in both the End Date and Start Date (see previous option) fields.
Select the checkbox to print a separate report that includes mailing labels for the selected families or members.
Lists the options available for inserting a handwritten signature image at the bottom of the letter. Select the desired option. If you do not want to include a handwritten signature, select None.
![]() The options appearing in the Signature dropdown list are defined in the donor report configuration. For instructions on configuring the options in this list, go
to Signature Options.
The options appearing in the Signature dropdown list are defined in the donor report configuration. For instructions on configuring the options in this list, go
to Signature Options.
![]() For instructions on creating a signature image to insert in your reports, go to How to Create a Signature Image.
For instructions on creating a signature image to insert in your reports, go to How to Create a Signature Image.
The dropdown list includes the letterhead options available for insertion into the header area at the top of the letter. Select the desired option. If you do not want to include a letterhead, select None.
![]() The options appearing in the Letterhead dropdown list are defined in the donor report configuration. For instructions on configuring the options in this list,
go to Letterhead Options.
The options appearing in the Letterhead dropdown list are defined in the donor report configuration. For instructions on configuring the options in this list,
go to Letterhead Options.
Body of StatementBody of Statement
The dropdown list includes the options available for inserting text into the body of statement area in the letter. Select the desired option. If you do not want to include body of statement text, select None.
![]() The options appearing in the Body of Statement dropdown list are defined in the donor report configuration. For instructions on configuring the options
in this list, go to Body_of_Statement_Templates.
The options appearing in the Body of Statement dropdown list are defined in the donor report configuration. For instructions on configuring the options
in this list, go to Body_of_Statement_Templates.
The dropdown list includes the options available for inserting a printed name under the handwritten signature in the letter. Select the desired option. If you do not want to include a printed name, select None.
![]() The options appearing in the Printed Name dropdown list are defined in the donor report configuration. For instructions on configuring
the options in this list, go to Printed_Name Options.
The options appearing in the Printed Name dropdown list are defined in the donor report configuration. For instructions on configuring
the options in this list, go to Printed_Name Options.
Family RegistrationFamily Registration *
Select an option to filter the report by family membership:
- Both: the report includes both registered and non-registered families.
- Yes: the report includes registered families only.
- No: the report includes non-registered families only.
Family WorkgroupFamily Workgroup
The dropdown list includes the family workgroups created in your organization. Select one or more workgroups you want to include in the report.
Select One or more FundsSelect One or more Funds *
The funds list shows the names of funds you can select to include in the report. You must select at least one fund in this list.
![]() The list includes only those funds the logged-in user has permission to access.
The list includes only those funds the logged-in user has permission to access.
Select One or more Family GroupsSelect One or more Family Groups
Lists the family groups created in your organization. Select one or more groups you want to include in the report.
Related Topics
How to Create Contribution Detail Statements
How to Create Canadian Tax Receipts
How to Create a Tax Receipt Summary Report
How to Create a Pledge Statement Report
How to Create a Non-Giver Letter Report
How to Create a Signature Image